Category Archives: Classroom Resources

A few words on assessment

I just Googled the word “assessment” it came up with over 124,000,000 responses.  Clearly, assessments are everywhere, I can’t tell you how many different kinds we use, but I do want to share two that we have come up with that have proven very helpful.  We use these in the classroom, so that we have a clear picture of what the children understand, and we share them with parents, as a tool to show what their children have learned at school.

The first is a basic skills assessment.  This was developed for the preschool classrooms, and while the skills may seem very basic, they are exactly what we work on with preschool children.  The skills covered this particular assessment include;

Writing samples

2D Shape recognition

Upper and Lowercase letter recognition

Phonetic letter sounds

Number recognition

Number sequencing

10 Frames/Subitization

Patterning

Rhyming

Days of the week and Months

This assessment pack (available on Teachers Pay Teachers) also has printable flashcards to help keep each child’s focus as you work with them.  We make one copy per child and use different colored highlighters to track their growth throughout the year. Image


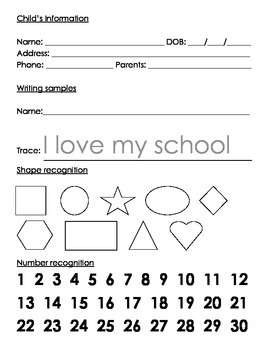
The second assessment that we use is standards based.  We took all of Ohio’s Early Learning Development Standards and put them in a spreadsheet that follows the child throughout their development.  The Infant/Toddler version can be used for the first threes years of a child’s life, and the Preschool version can be used from the time a child turns 3 until they turn 6.  This allows teachers to record periods of growth, and parents can see exactly when their child reached certain milestones. These assessments are much longer and more comprehensive than the basic skills assessment, and we typically fill them out only once per year, you can find the Infant/Toddler version and the Preschool version on Teachers Pay Teachers.Image


These are only two of the many, many different forms of assessment that we use, but they are great tools for both parents and teachers!

Meet the Teacher Freebie

It’s back to school time, which means it’s time for everyone to get to know the teacher.  Here is the printable that we will be using on our bulletin board, feel free to use it in your classroom! All graphics are from Erin Bradley Designs.

Image

When you run out of cute tubs…

We have been working hard to get our space ready, and though we were lucky to find a place with a wonderful amount of storage, there is never ENOUGH storage space.  If you are a little crazy like me, then you prefer all of the tubs, buckets, random storage containers to at least coordinate, it just looks so much neater!

most parents and teacher will tell you that kids’ stuff is not made to fit nicely into small spaces, so as we put our materials away in their new homes, we quickly ran out of containers in which to store them.  Here is our solution – cardboard boxes covered in fabric – this was so easy that I will be doing this ALL THE TIME!

Start by choosing a sturdy box, look for one that is easy to lift when it’s full. Cut off the top flaps.

Then choose your fabric, the size of your fabric will depend on the size of your box.  If you can set the box in the middle of the fabric and lift each edge of the fabric up the corresponding side of the box, with extra left to fold into the inside of the box, then your fabric is big enough.  I have a bunch of upholstery scraps that had been donated, so that is what I used, you can use any kind of material, the only rule is to make sure that any wording on the box does not show through the fabric. 

To start, lay the fabric flat on the floor or a large work space, place the box in the middle.

Image

Use a yard stick (or quilting ruler in my case) to make a straight line from the box to the edge of the fabric.  You want to place the outside edge of the ruler approximately 1/4 of an inch past the edge of the box to leave space for a seam allowance. 

Image

Image

Do this for each corner of the box, until your fabric looks like a large plus sign or cross.  cut on the lines.

Image

Image

Image

Sew the sides together (right sides of the fabric together), to create a fabric box (it should be inside out)

Image

Flip the fabric cover right side out and slide the box inside.  Then fold any extra fabric over the top of the box, into the middle, and attach to the edges with hot glue!

Image

these are perfect for any space because you get to customize everything – the size of the box and the way that you want it to look, and they are perfect for kids spaces, or spaces that don’t get used often because they are very inexpensive!

Making Shelves Useful & Artistic

Lots of classrooms have the bookshelves with the not so pleasing pegboard backing on them; but they don’t have to be an eye sore in your beautiful classroom. I have found ways in the past to make these serve as both functional and artistic as well as found some new ideas while searching the internet. It is great when you can use the shelf to divide classroom areas and still be able to have the back of the shelf be functional so both sides are serving a purpose and it saves on having lots of furniture in small spaces.

Here are some of the ideas leaving the pegboard feature showing but maybe painting it to look cuter:
~ add peg hooks with cute baskets to hold supplies for art or writing centers
~ use hooks to hold tools and materials in the block area
~ hooks can be added to hang up clothing in the dramatic play area
~ pegboard holes can be used as fine motor activity area or to create 3-D art mural by using items such as
pipe cleaners or straws to stick in the holes; my last class discovered this idea on their own and loved
it!

Some ideas for the backs of shelves that will cover existing back are:
~ Attach felt to back and use as a felt board for story time or reading center
~ Paint with chalkboard paint (which you can make yourself in any color) and use in art or writing center
~ Paint with dry erase paint (yes they sell that too!) or you can buy sheets or laminate a larger sheet of
paper and use for circle time, art or writing areas
~ Paint with magnetic paint (another great invention!) and use in science area or for magnet stories
~ Using shelves for documentation and displaying the children photos and work is great idea too, especially
because it is as their eye level and looks way better than a bulletin board with stapled papers on it!
~ Make into a work of art by covering with material, paper, sheet, anything that the children can paint,
draw, etc. on and it can hang on the shelf as art mural

Some new ideas for shelving without the typical shelving units:
~ Using old dressers without the drawers; paint it up pretty and looks cute
~ Paint or line with cute contact paper/wallpaper the inside back panel of shelving units
~ Adding baskets to the shelves to hold lots of small items

I will post some photos of the ways we use or shelves and some of the new furniture trends we decide to use in the new classrooms to organize and create separate areas as we begin moving in the center. In the meantime, how do you guys use shelves in your classrooms or homes, making them functional and pretty?

Every teacher needs one of these!

Image

This is the best teacher planner/organizer ever! We have them to use in the classroom this year at Inspirations, and we are so looking forward to filling all of these pages.

They were created by April at A Modern Teacher, and can be purchased at her Teachers Pay Teachers Site.  What makes them the best ever is that they are 100% customizeable.  You can type right on the pages before printing them, and she has a number of different layouts for the exact same information, so if you want something a certain way, then you can have it that way! Plus, you only print the pages that you want to use – we don’t need to track actual grades, so we didn’t choose to use those sheets.

Image

Image

Image

There are a million different ways to use her layouts – it’s like organization overload, but we absolutely love it!

All photos are from A Modern Teacher

We are looking for a few things…

In the many years that the four of us have been teaching we have accumulated a lot of stuff, but opening a eccentric requires even more stuff! Here is a list of some of the items that we are looking for. If you have any of these things that you would like to donate to Inspirations Early Learning Center it would be greatly appreciated! Please email inspirationselc@gmail.com to set up a time that we can pick them up. Thank you!

Adult sized chairs – kitchen or office type

Radios with CD players

Paper products (silverware, plates, cups)
Paper towels
Grocery bags
Scrap paper
Double strollers
Bibs and burp rags
Changing table pad
First aid supplies 
Outdoor toys
Sandbox with a cover
Deck storage box
Storage bins – any size
Ziplock bags – any size
Kleenex
Area rugs
Office supplies 
School supplies
Hand soap
Diaper wipes
Towels and rags
Toilet paper
Dress up clothes
Garbage bags
Beach umbrella
Address labels
Spray bottles

Sensory Sanity

We do a lot of sensory activities, which means that we use A LOT of sensory materials.  Making sure that we have everything that we need for an activity is important.  No one wants to disappoint a room full of preschoolers who just want to make flubber!

The best solution the we have found for cataloguing our supplies, is also the best solution for storing them. We use Rubbermaid Kitchen containers to store supplies.  Not only do these keep the supplies fresh, and the critters away, but they are clear, so we can always see what we need more of.

The containers are available in a number of different sizes, so that you can store and entire bag of flour, or a single carton of baking soda.  They range in price from 3.99-9.99 depending on size, and completely worth the investment.  We’ve all had the avalanche of Ziploc bags, we consider these an essential!

Image

The BEST way to share photos

smilebox

One of my favorite teacher-parent communication tools is Smilebox. Smilebox is a tool that allows to drop their own photos into pre-made scrapbooks, collages, slide shows, and digital cards.  Smilebox offers premium services to teacher for free, so all of the designs are available for teachers to use.

Documentation of children’s learning is an important piece of what we do.  Sharing documentation with parents is a great way to make all of the learning that happens in the classroom very evident, and Smilebox makes it easy.  It also encourages conversations between parents and children as they watch a slideshow together.

After downloading this free program to your computer you can simply choose your format and theme.  Then you upload your photos from your computer or your camera and slide them into the spaces in the design. Smilebox allows you to choose color schemes, the level of embellishments that you want in your design, music to go along with your slideshow, and if you want journaling to go along with your photos. Not only can you email projects to parents, but you can also print the images to utilize in the classroom.

Smilebox makes it easy for teachers to share what the children have accomplished.  This is a tool that I could play with for hours, every time that I use it I find something new!

The perfect time to get organized

Summer is the perfect time to get organized and today I want to share one of my favorite organizational ideas.  It seems so simple, I can’t believe that I didn’t think of it before!

Classrooms and homes are similar in that there are always a million things going on, and whether you are a teacher or a parent, your to-do list is never ending.   Getting things done on that to-do list is often a team effort, which requires a ton of communication.

This to-do list template has a space to initial the tasks that you’ve completed, which is easy, and genius! Share the list with your co-teacher and then you know who has completed the task, and if you have any questions about it, you can ask the person who completed it.  If you have a classroom aide, or a parent volunteer, you can share the list with them, and show them which tasks they can complete.  Then, when you can’t find that printable that you know you laminated, you can ask the parent who cut out the lamination where it ended up. 

At home, share the list with the baby-sitter, and point out which tasks he or she can work on after the children are asleep. Then, when you can’t find the soccer jersey you can text the babysitter and see if she saw it when she was folding the laundry.

Print this template and hang it on the fridge, or do what I did and cut each list out and have them bound into a notebook.  Then your only task will be not misplacing your new notebook!

to do list